With a small house and a growing family the entryway is a constant problem. No storage or an actual mudroom let me to create a custom entryway system and an organized “mudroom”. This DIY project has been moved and pictures lost but the concept is still intact – November 2016
The Problem:
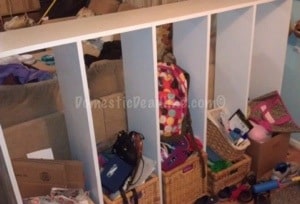
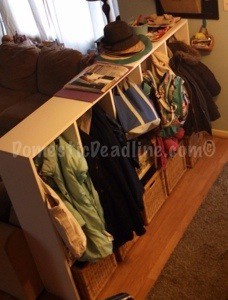
When I walk down the stairs every morning, this was the first thing I see:
 Not exactly the ideal way to start my day…. And did I mention, that was also the first view guests saw when they came in my front door?
No mudroom and a small coat closet has caused our entryway space to often be overrun with clutter. The cubbies pictured above worked for a little while. The kids each got a set; shoes in the basket, backpack and personal items in the cupboard and coat hung on a hook in the coat closet. One for each kid and the fourth for me.
I slid boot trays under the units to accommodate IronFish’s shoes and my overflow. He had a places to stash his work bag under a table where he left his wallet and keys every night. It worked. For a while. Then it didn’t.
And did I mention I planned on painting the cubbies but never did because it meant they’d be out of commission for a while?
So I set to work searching the internet to buy the perfect system that would fit my space and our family’s needs. It just didn’t exist.
Do It Yourself Myself
My measurements are obviously based on my space, but were also selected as to best utilize the wood and minimize cuts. I had six feet of space to work with and it needed to be narrow, my couch is on the other side of the piece.
Materials:
- (8) 1×12 boards (I used paint grade), six foot lengths
- (1) full sheet of underlayment
- (10) two prong coat hooks
- (40) shelf pegs
- Circular and radial arm compound miter saw
- Nail gun and nails
- Level
- Wood filler
- White paint and pains brushes (or color of your choice)
- Optional: Minwax 78500 Regular Finishing Wax, 1-Pound
and Cheese cloth
Paint all the wood white (or color of your choice), both sides, two coats. Two of the six foot lengths stay full, these will be your top and bottom pieces. The other six pieces cut off two 13 inch pieces which should leave you with 45 inches, make sure they are all exactly the same.
Assemble the Structure
It’s possible to do with one person, but definitely easier with two. Butt the cut end of one 45″ piece to the end of one of the 6′ pieces, nail gun in place and repeat with another 45″ piece at the opposite end. Nail the other 6′ piece to the opposite ends of the 45″ pieces, creating a giant box (it’s best if this is laying down), the top, bottom and ends of the cubbies. Next evenly space the rest of the verticle 45″ pieces.
I stood the piece up in place to make sure I was happy with it…. And because I ran out of time working on it and needed a place to put it for a few days!
With the box laying flat on the ground; lay the underlayment on top and line up the top and one side along the edge. Scribe the other two sides and cut using a circular or jig saw. Attach to the back with a nail gun or finishing nails.
Customize with Shelves, Hooks and Baskets
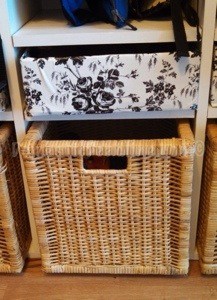
Decide where to put the shelves. Originally I planned on covering boxes in burlap to act as shoe bins, however I realized the old Ikea baskets would then be looking for a home, so I might as well keep using them. Mark where the first shelf should be, with enough room for the basket to slide in and out. Mark 4 holes, two on each side making sure they are level. Drill the holes large enough for the shelf pegs to fit snugly into them. Place your shelf and repeat in all the other spaces. Repeat the whole process if adding a “drawer” or other basket. I made my “drawers” out of boxes cut to the right height, about 4 inches.
Mark and pre-drill holes for the coat hooks, one set on each side of the cubbies. If you’ve made boxes, cover them; I used contact paper but I also considered duck tape or fabric.
 Fill it up!
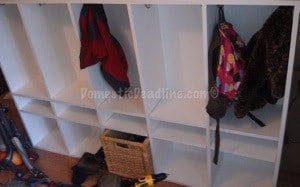
Now when I walk down the stairs in the morning, this is what I see, soooooo much better. Between this and my wall mounted mail sorter, my entryway functions and as long as I keep on top of the kids, it looks nice when company comes knocking!
Really Fill it Up!
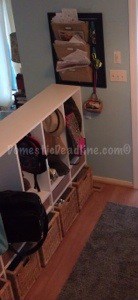
All right, truth, this is what I see when I walk down the stairs in the winter. Things really packed in there. But, I still think it is a great use of space and I can’t even imagine what I’d be dealing with if we were still using the old system. As the girls are getting older, I’m working on reminding them that if it doesn’t fit in their cubbies (ie bags for various activities) then they should find a place in their bedroom for it.
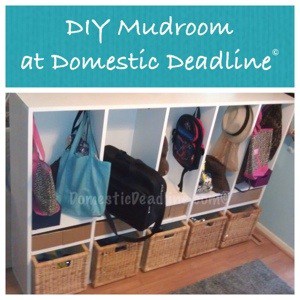
Either way, everyone has their own space for the things that they need to get out the door for school and work. I’m still dreaming of a mud room, but in the mean time, this will definitely work for our family!
I really thought I had taken more pictures, but I have no idea what happened to them (or if I actually even did!). Since I’m not going to be building another one any time soon to take more pictures, please ask questions and I’ll gladly do my best to answer!
Tip:
Using cheese cloth or another lint free cloth, rub clear furniture wax into the whole piece and wipe off with a clean piece of cheese cloth. It forms a protective layer over the cubbies making marks and spills wipe off easily.
Do you have a mudroom? How do you deal with the daily clutter of coats, shoes and bags?
Wow – I’m impressed! You’ve got mad DIY skills, Girl! I love the way you used the piece to separate your living room from the entryway.
Thanks! Using it as a divider was the only way since the door opens right up against the opposite wall.
A place for everything and everything in it’s place 🙂 I love it! We have the same issue walking into our house. Thanks for the inspiration! ~Kelly
Glad I could help! I do sometimes wish I had a bit more space and could have made them bigger, but it is still a drastic improvement!
This looks great! it’s always nice to have an organized entry. thanks for sharing!
Thanks! I’m always trying to organize something…. if it would just stay that way it would be easier!
You did an awesome job–I can’t believe you built that yourself! We have a mud room and it’s a CHORE to keep organized but it’s nice to have a place for everything. The key is editing everything out each week because it all piles up!
I am constantly telling the kids to clean out their cubbies! It’s supposed to be once a week, but my 6 year old’s job is to put the stuff back in the right cubbie, then the girls have to put stuff that doesn’t belong there away.
You did an a great job! We also have a small entry way that can get cluttered at times but this looks really nice. Thank you for sharing your creativity.
Roll with the small space in any way you can!
What wonderful ideas and what an amazing transformation! I have yet to figure out a system for my husband. You gave me some great ideas 🙂
Glad I could inspire!
If we had the room that would be perfect. Great design and idea!
Thanks!
You did a great job of getting organized in such a small space. THanks for sharing your tips!
thanks and you’re welcome!
I love it! Do you have ideas for teenagers??? LOL. They seem to through their stuff everywhere! Thanks for sharing!
I’m entering the teenage years pretty soon, I’m hoping to have a good system in place before we get there…. fingers crossed!
This is amazing. I am such a lazy bones – always looking for easy peasy ways to do things, and wondered if a bookcase, set on its side and stabilized with brackets might work too. The shelves would have to be pretty wide, but it is a thought.
I actually considered using a bookcase and screwing the shelves in place to stand vertical. Since I didn’t already have a bookcase, I thought about how long it was going to take me to assemble one (that I’d have to paint anyways because of not finding one in a color I wanted) and realized if I spent the time calculating my cuts instead of searching the internet for the right sized and colored one, I would at minimum break even with my time! Plus, if you don’t have the ability to make the cuts yourself, if you know what you need ahead of time, places like Lowes and Home Depot will do the cuts for you, just ask!
Wow – nice job. I’m really impressed. I’m sure you will like your new organization. I wish we had room for something like this. I’ll be thinking on it myself. Thanks for linking up at Take it on Tuesday!
~ Betsy @ Romance on a dime
Pingback: Take it on Tuesday blog hop #117 - Romance on a Dime
Pingback: How to Clean Paint Brushes - Domestic Deadline : Domestic Deadline