Update: As part of relaunching this blog in 2016, I am attempting to update and edit several of my old posts. My photography skills have only slightly improved. Unfortunately, I can’t go back in time and re-take the pictures. Bear with me, I’m a constant work in progress!
DIY Distressed Dresser
Every summer my family spends time on Lake Erie. My kid’s are the 7th generation to stay in my parent’s lake house in Linwood Park. Since I moved every few years while growing up, this is home to me even though we rented it out during most of the summer. However, a few years ago, my parents moved in year round and last summer I got started redoing my bedroom there.
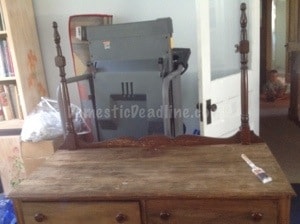
A few weeks back, I shared my Driftwood Fish, he hangs on the wall in this room. I also took the old dresser that has been in my room for years and gave it a makeover. Many years ago my mom stripped the dresser with the intention of re-staining it…. yeah, that never happened…
I took the mirror off before I took any pictures. Since I wasn’t blogging at the time, I didn’t do a full tutorial but I’d love to show you the before and after pictures.
Unfortunately, it looks like I only have the one before picture! Pretty distressed to begin with. It has great bones but didn’t have any pizazz… Easily fixed!
More Inspiration
I’ve looked at some awesome tutorials of how to refinish furniture, here are a few of my favorites:
- Domestically Speaking – gray cabinets
- DIY 180 – How to paint furniture
- Miss Mustard Seed – Difference between milk and chalk paint
- Just a Girl – How to paint furniture
I chose to dry brush a variety of shades of gray and then sand off some areas. My main color of choice was Benjamin Moore’s Hearthstone (#1601) in flat. Using leftover white and black acrylic craft paint, I mixed a few other shades. I had fun with it and just went for it. It’s only paint!
What I have found in painting and refinishing furniture is there is a lot of trial and error. I just go for it and have fun. One thing I always do when finishing furniture, new or old, is to coat it with Minwax Finishing Wax using a soft cloth to apply it and a clean soft cloth to buff it.
After
Here’s the finished piece! No, it doesn’t go in front of the window, but I got it in there and put it back together, then remembered to take the picture! It’s in a small room, so getting a picture of it in place is really hard, the bed is kinda in the way.

Tip: Try staining some of the wood it’s original color to add contrast to the piece. I waxed the top since it was in great shape and now it looks even better! Power of Paint has some great inspiration!
Have you ever finished furniture? Any tips to share?
Newer posts you may enjoy:
- I’m working on redoing my mudroom, giving it a farmhouse feel and great function. Check it out here.
- As a constant work in progress, I believe in editing. Blog Along with Me and see why
- Paint and tape can be used on canvas to give a theme to a whole bedroom, see O-Man’s Minecraft room.


33 Comments